Spring Boot로 프로젝트를 생성하고, Thymeleaf 를 이용하여 부트스트랩 템플릿을 적용해보도록 하겠습니다.
SpringBoot 프로젝트 생성
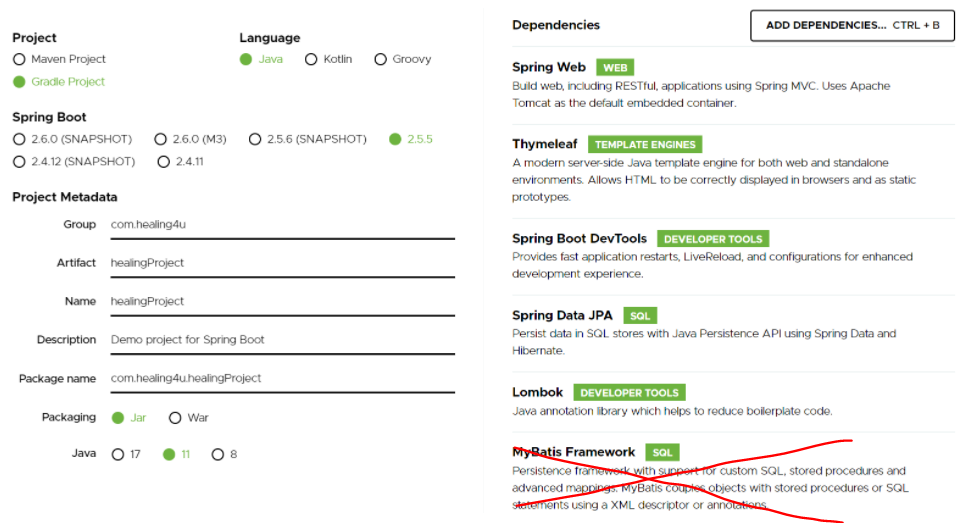
여기에 접속하면 쉽게 생성 가능합니다.
개발 환경
- Gradle
- Java
- Spring Boot 버전 : 2.5.5
- Java 11
- Packaging : Jar
- 의존성 추가 : Spring Web, Thymeleaf, Spring Boot DevTools, Spring Data JPA, Lombok
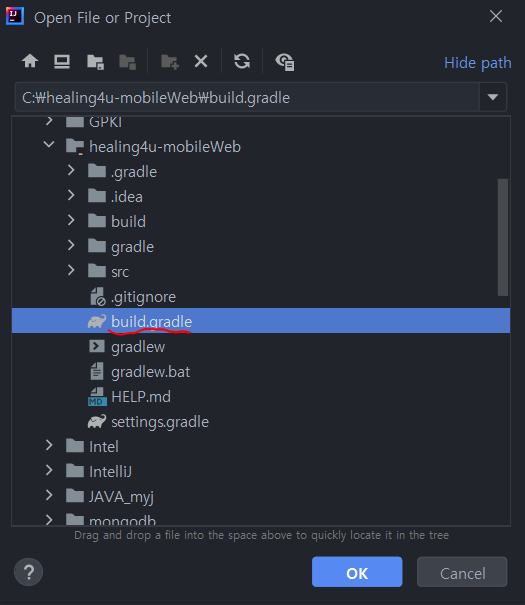
위의 설정으로 다운을 받고, 알집을 풀고나서 IntelliJ에서 Open Project를 클릭합니다.
gradle로 설정했다면, 아래와 같이 build.gradle파일을 클릭하여 프로젝트를 열어 Build합니다.
Bootstrap 연동
0. 의존성 추가
만약, (위처럼) 프로젝트 생성 시 Thymeleaf를 추가하지 않았다면
build.gradle 파일의 dependencies에 다음을 추가합니다.
implementation 'org.springframework.boot:spring-boot-starter-thymeleaf'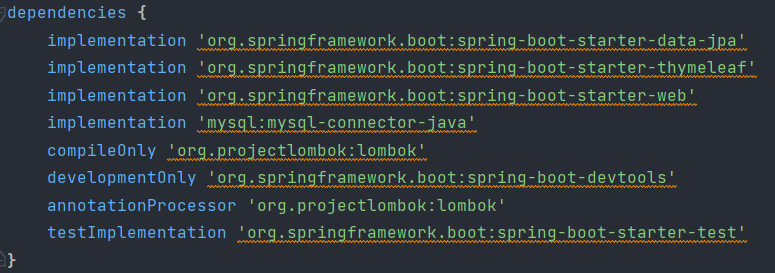
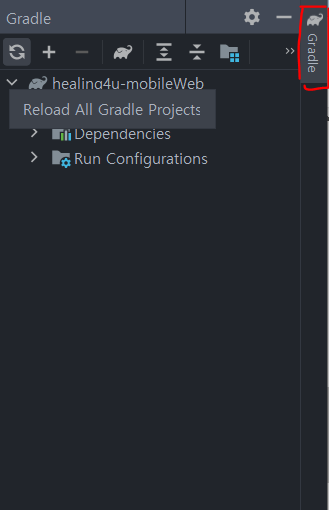
바로 반영해주기 위해 우측의 코끼리 모양 Gradle을 누른 후, 새로고침을 눌러주면 됩니다.
1. resource 파일들 추가
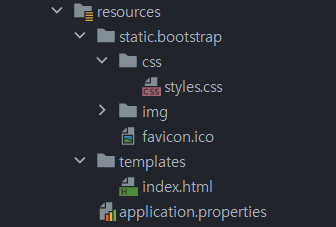
src>main>resources 디렉토리 아래에 추가해줍니다.
본인은
static>bootstrap 에 css와 img를,
templates에 html 파일을 넣어주었습니다.
2. application.properties 추가
아래 옵션 설정을 추가하였습니다.
# static resources에 변경사항이 생겼을 때 즉시 반영됩니다.
spring.devtools.livereload.enabled=true
# thymeleaf 참조 경로 설정
spring.thymeleaf.prefix=classpath:/templates/
spring.thymeleaf.suffix=.html
# thymeleaf 캐시 저장 X (운영시에는 true)
spring.thymeleaf.cache=false
# templates 디렉토리에 파일 존재 여부 체크, 없으면 error
spring.thymeleaf.check-template-location=true
# thymeleaf 사용
spring.thymeleaf.enabled=true
[application.properties 코드 추가]
주석에 한글로 적으면 프로젝트 실행 후 이상하게 깨져있어 영어로 적어놓았습니다.
# It is reflected immediately when there is a change in static resources.
spring.devtools.livereload.enabled=true
# The path to refer to thymeleaf
spring.thymeleaf.prefix=classpath:/templates/
spring.thymeleaf.suffix=.html
# It does not leave a cache for thymeleaf. (true in operation)
spring.thymeleaf.cache=false
# Check whether there is a file in the templates directory, or not, causing an error.
spring.thymeleaf.check-template-location=true
spring.thymeleaf.enabled=true
3. Controller 추가
CSS가 잘 적용됐는지 보고자 컨트롤러 한개를 추가합니다.
본인은
java>com.heaglin4u.heagling4umobileWeb>controller>IndexController 클래스를 생성했습니다.
package com.healing4u.healing4umobileWeb.controller;

import org.springframework.stereotype.Controller;
import org.springframework.web.bind.annotation.GetMapping;

@Controller
public class IndexController {
    @GetMapping("/")
    public String index() {
        return "index";
    }
}
4. 서버 구동 및 확인
main 클래스 (본인은 Healing4uMobileWebApplication 클래스) 를 실행시켜 서버를 구동시킵니다.

현재 수정 진행 중인 모습이지만.. 적용이 잘 된 것을 확인할 수 있다.

피드백은 환영입니다 :)
'백엔드 개발하며 작성한 > Spring' 카테고리의 다른 글
| JAP Query로 특정 칼럼의 count 쿼리문 실행하기 (0) | 2021.11.12 |
|---|---|
| [Spring Boot 프로젝트] AWS EC2로 Spring Boot 배포 (0) | 2021.10.16 |
| [Spring Boot] 테스트 코드 작성 (Hello World편) (0) | 2021.10.13 |
| ORM(Object Relational Mapping)과 JPA(Java Persistence API) (0) | 2021.10.07 |
| [Spring Boot] 프로젝트 세팅부터 REST API까지 (0) | 2021.09.26 |
![[Spring Boot 프로젝트] 1. 프로젝트 생성과 Boot Strap 템플릿 적용(Thymeleaf)](https://img1.daumcdn.net/thumb/R750x0/?scode=mtistory2&fname=https%3A%2F%2Fblog.kakaocdn.net%2Fdna%2FBFOv9%2Fbtrg4JCQPch%2FAAAAAAAAAAAAAAAAAAAAAPeDTj6b7u8W4Kr7WQn8uNKeXIOM4LUOpSaRYikVCafc%2Fimg.png%3Fcredential%3DyqXZFxpELC7KVnFOS48ylbz2pIh7yKj8%26expires%3D1764514799%26allow_ip%3D%26allow_referer%3D%26signature%3Da0eIrp7eOpwAaCT2oDNMzhkxxfg%253D)